To start off I will give you the pictures.
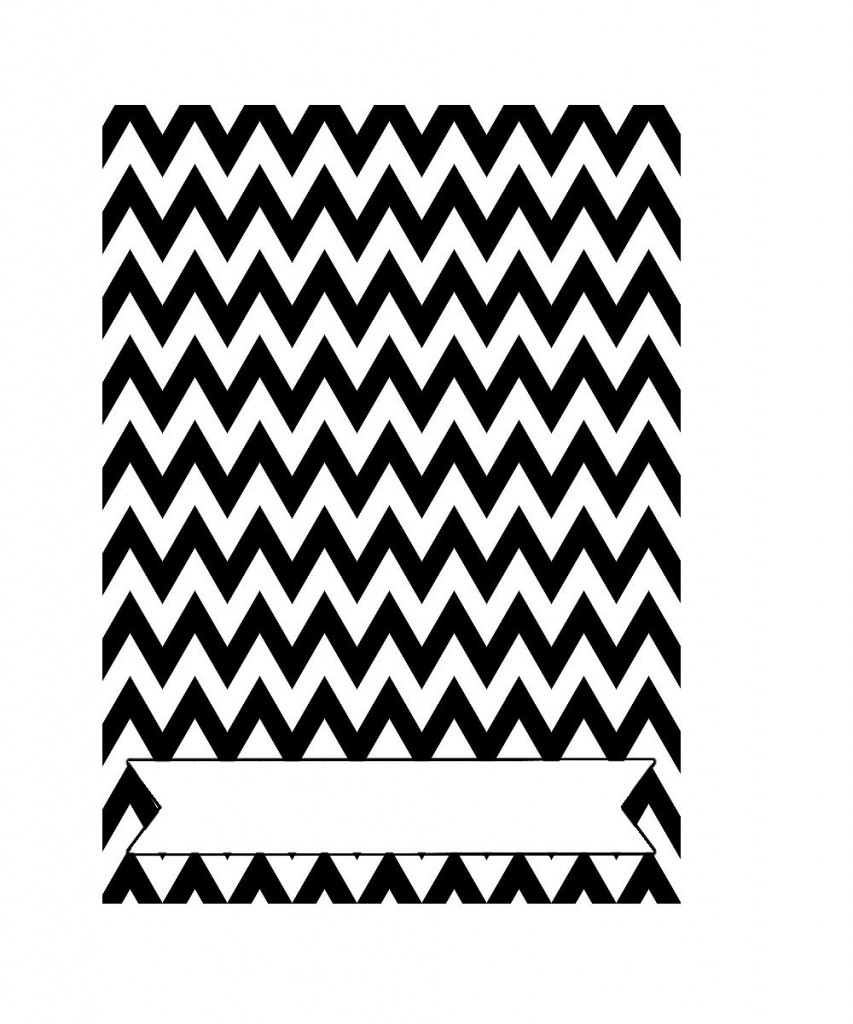
Below is the first picture:
I will show you how change the color and how to add a picture. It’s easy, I promise!
Just right click and save picture as.
For my cards, I did a polka dot back. So instead of seeing a plain white background I see cute gray polka dots! 🙂
Below is the background picture:
Again just right click and save picture as or save image as.
Here is my Gimp tutorial on how I added the pictures and changed the color of the chevron. I really hope this helps you all!
Step 1: Start out by opening your black chevron background you just saved, into GIMP. To do this go to File; Open; and click wherever you saved the photo.
Step 2: Changing the black to a different color choice.
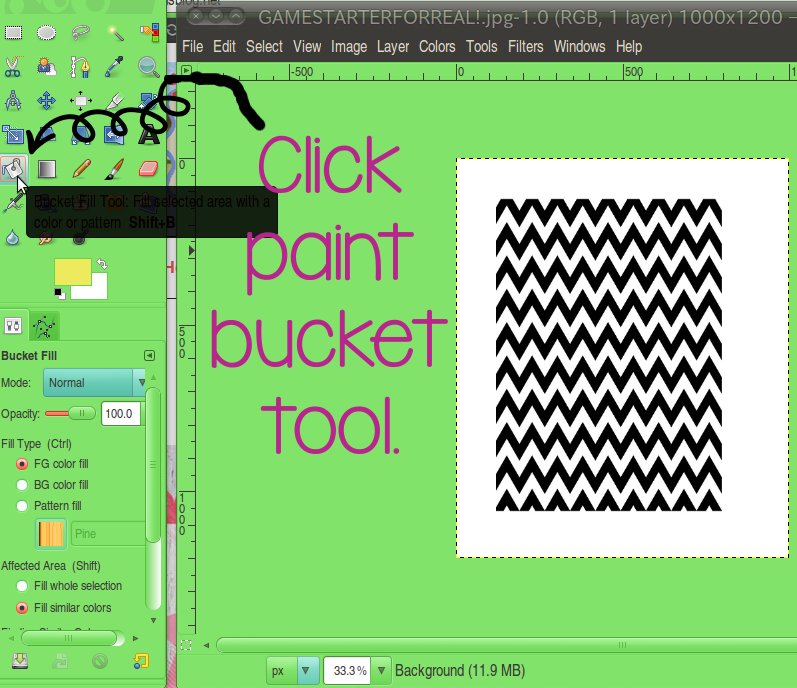
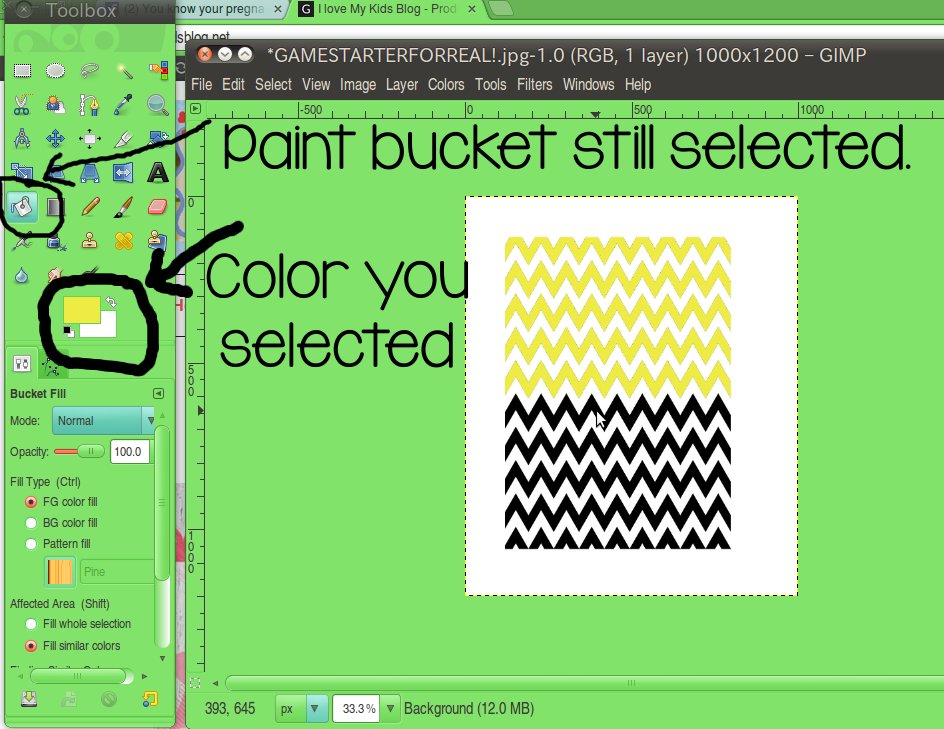
-Click the paint bucket tool (picture below will show where it’s at.)
Click the top square below all the tools, it should be black but mine is yellow in the picture.
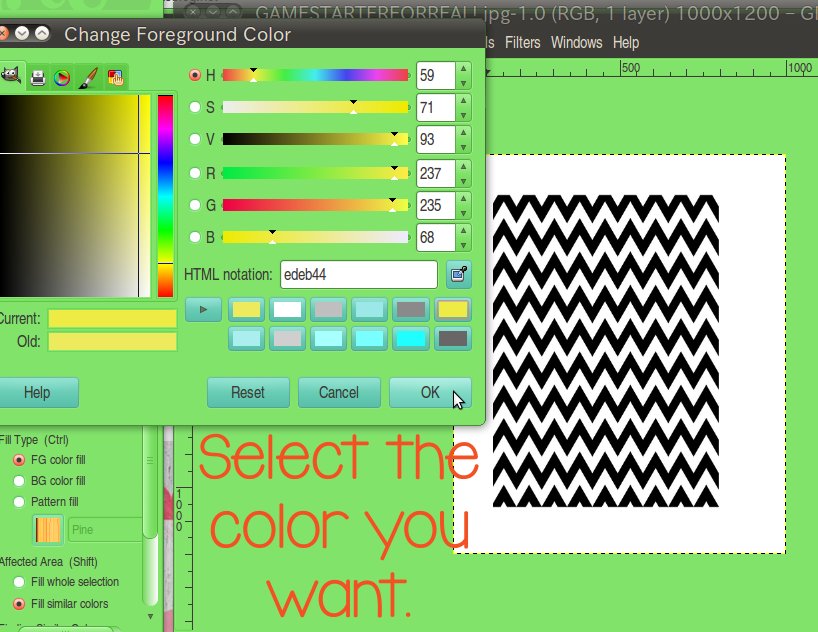
Step 3: Once you click the top box it will open up a color changing box and should say, “Change Foreground Color”.
-Choose any color you’d like then press okay. The box should now have the color you chose instead of black.
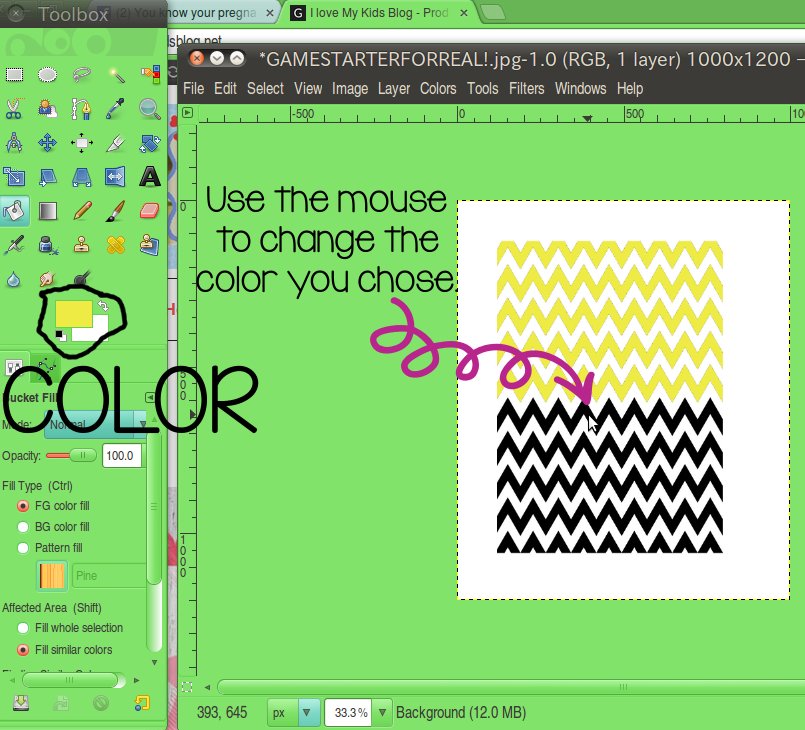
Step 4: Take your mouse and click on the black chevron and it should change the color. In the picture below mine turned yellow. If you mess up you can go to the top and click Edit; Undo. That will undo your mistake.
Step 5: Adding the Picture!
To get the picture you want you might have to crop the picture before hand. You could make it a smaller size as well, but if not I will show you how to make a picture bigger and smaller.
-Start out by going to the top and selecting File; Open as layers.
–Find the picture you want to add and press okay.
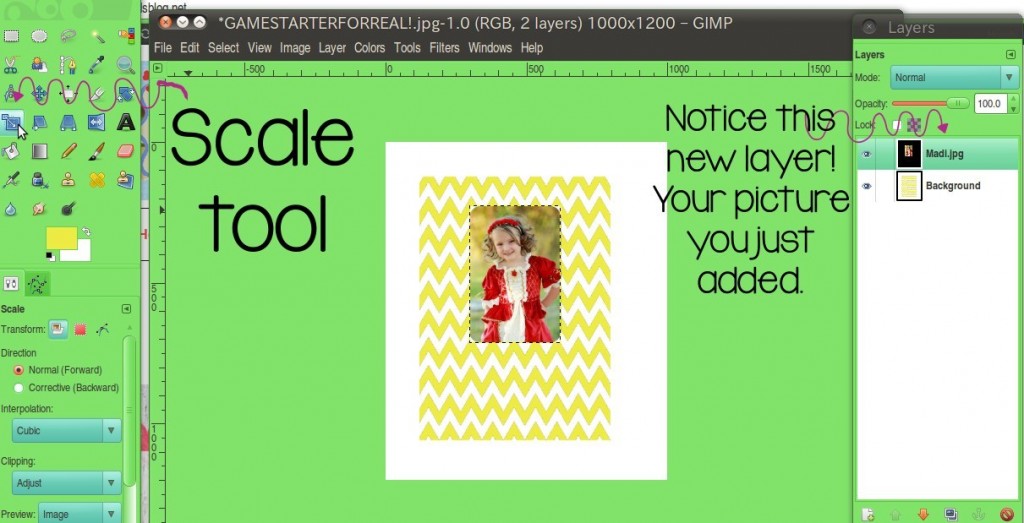
Your picture will appear. It may be small like mine or very large! (I made my images smaller before I added it in, it was just easier for how many people I was doing.)
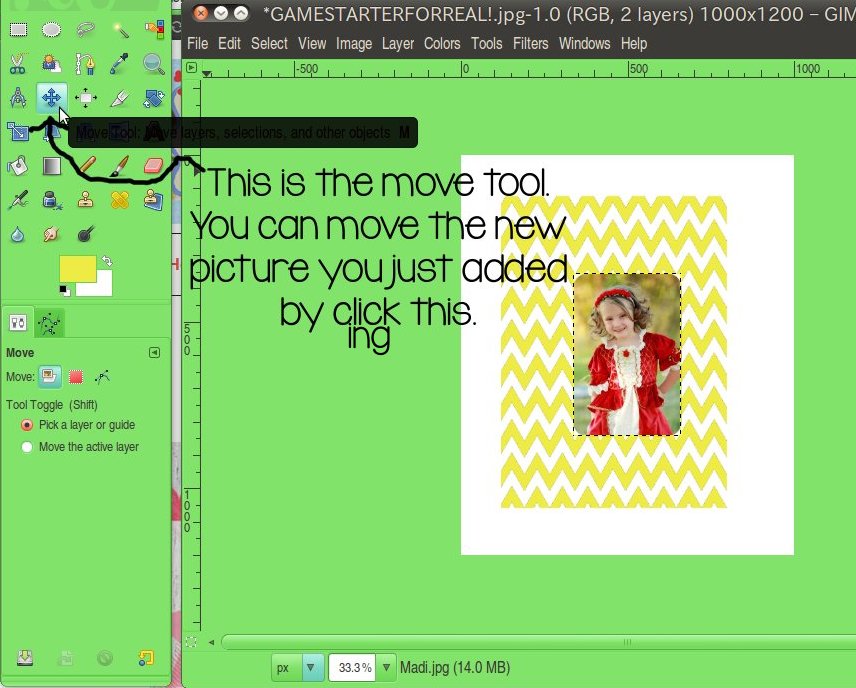
You will have to center the picture to where you want it to do this you can click the picture on the side that looks like a plus sign. (Pic below)
Once that is selected you can click on the picture and move it where ever you want.
Step 6: Making the picture bigger or smaller.
If your picture was bigger it may have covered your whole background that I gave you. I will show you how to fix that.
-Click the SCALE tool the scale tool is in the picture below.
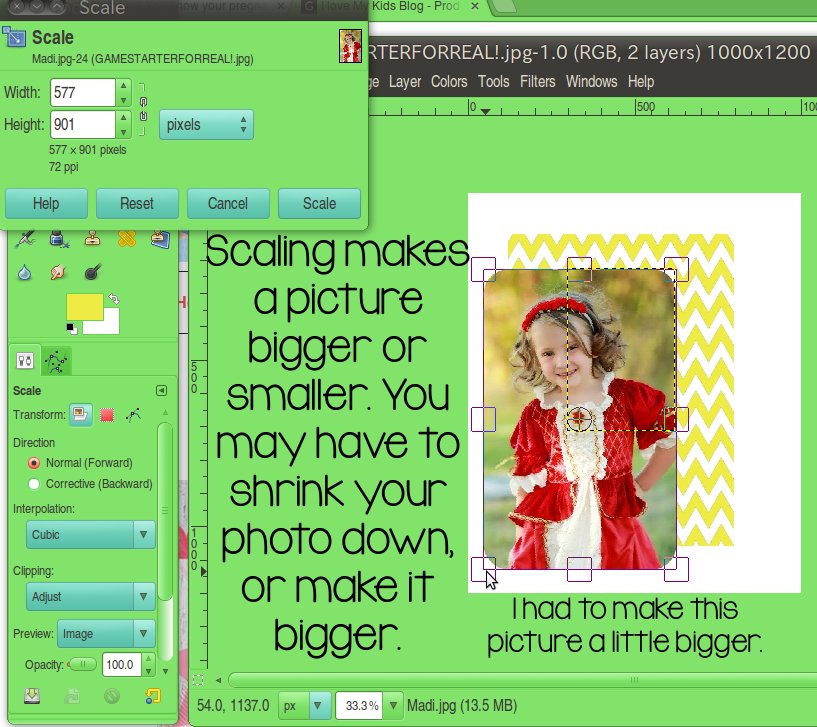
Step 7: Once you click the scale tool click on your photo and box will appear on the screen. If you know the size you want the picture you can type in the numbers. I think the numbers I did was 520×660.
-But you can do whatever size you want to do by moving the edges of the picture.
-Once you get the right size click Scale in the box. If your picture was bigger it will take 10-30 seconds to change.
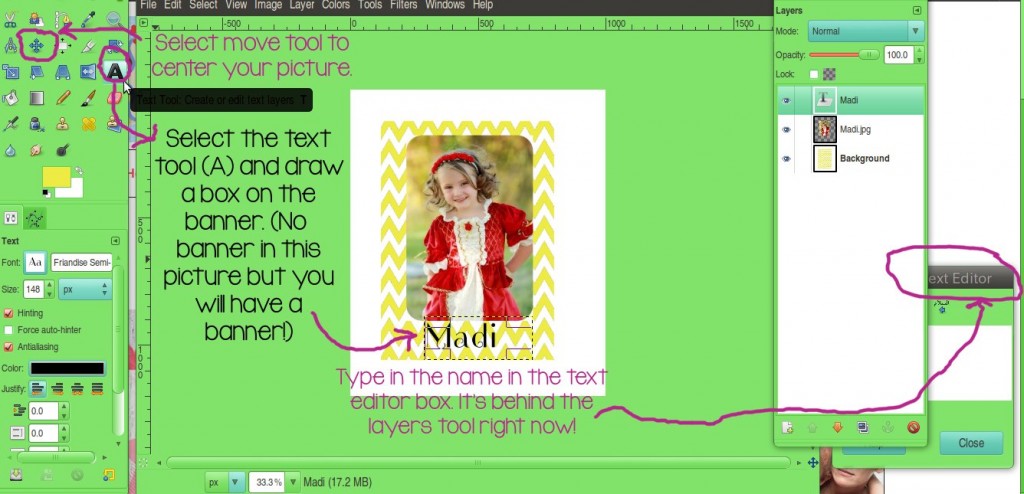
Step 8: Adding the name!
Center your picture to the right spot once you get it the right size. (Remember to hit the plus looking sign!)
-To add the name you have to click the “A” tool and draw a box on the picture. Find the font you love. (I am a font addict and have downloaded 300 fonts at least so I have lots of cute ones. GIMP does not come with many cute fonts, so I suggest downloading some.)
-Type the name in the Text Editor box. In the picture it is behind my layers bar, if it is behind like mine is in the picture just click it and it should pop up ahead of the layers bar. Type in the name in the box.
-To make the text smaller and bigger:
–below the color square you chose for the background is the font
–below that is the font you chose
–below that is the font size (it will be somewhere around the 90’s-120’s depending the name)
To change the color of the font you just click “color” which is below the font size (NOT THE TOP BOX YOU CHOSE FOR THE CHEVRON.)
To move the name you just need to click on the box and you can move it where you want.
You’re done and all you need to do it save it.
Click File; Save as; Save wherever you want it.
Make sure you save it as a jpg. in the box you would type this: ‘ CardGame.jpg ‘
And just keep clicking ok each time. Random boxes will keep coming up, but just push okay okay okay. (Or something like okay.)
There is my Gimp tutorial on how to add a picture and change the color. I hope this helps and feel feel to ask questions!
To go back to the tutorial on how I continued making my matching game – CLICK HERE!
- 5-Winter Themed Bone Chilling Survival Movies on Netflix - 12/29/2017
- 7 Best Scary Movies for Kids that are Streaming on NETFLIX - 10/13/2017
- Watch P. King Duckling on Disney Junior + Giveaway - 06/26/2017



1