
I just recently posted a picture of a chalk board picture, that I made for my daughters birthday. It was super cute, and I had to share. I’ve gotten many requests to show how I did it, so I will share!
If you haven’t noticed these chalkboard pictures online, have been HUGE. It is very common now to see all these chalk board pictures everywhere with everything. Please enjoy this small tutorial on how I do mine.

You can use any kind of photoshop or photo editing software. But I use GIMP. Gimp is an editing software much like Photoshop. But it’s FREE! I love Gimp. You can download it for free on the link above.
To start off, you need a chalk board picture, right? I looked around and found this FREE chalk board background. It’s 8×10″. A perfect fit for pictures. (So you can make an awesome printable, like me! Just click on the image and click “save image as.”

After you get your chalkboard background you’ll need to get some SWEET chalk board fonts. There are literally TONS of different fonts that work well with the chalk board, but I wanted to add a few of my favorites. (These are all free for personal use, but are not for commercial use.) I usually almost always get all my fonts at dafont.com. This is my favorite place. But there are other places to download free fonts. If you don’t know how get a downloaded font into your fonts folder. Look online. They have tons of video tutorials and blog posts about it.
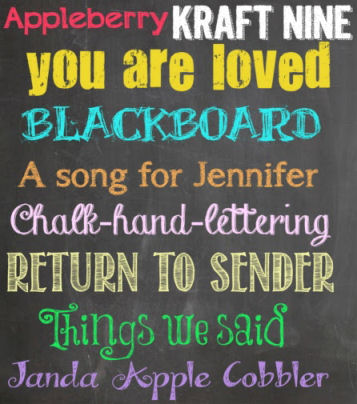
With a chalkboard printable, you’ll need some dingbats, and other stuff to decorate it with. They have lots of free ones but I have two favorite that I will share with you.
Here is the first: Bergamot
Here is the second: KG Flavor and Frames
Now that we have everything you need to do a chalk board printable picture, I will show you a little bit of how to use it with gimp.
1. I always like to go to VIEW on the top menu bar and then click ZOOM. I like to do this because I can see better and make sure everything is even on the picture.
2. Click on the A (font) And just start typing whatever you want. You can move the words you write anywhere and also change the size. This is the most vital part of the printable picture. If you write another word or phrase, the previous ones you did will be in your layers box. All you need to do is click on the layer with the words and you can move those words all around again.
Those are my 2 major steps. It doesn’t seem like much, but it gets easier each time you do it. I have 3 pictures that I will share that I made so you can use those for help with your chalkboard printables.
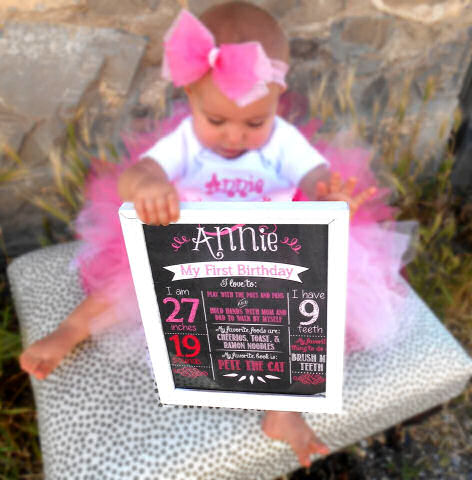
Here is the first one – It is a first birthday (or you could use it for some other birthday)

Here is a Birth Announcement one:

Here is one last one that I made for my daughters birthday, this is what it will look like in a frame. When I print it, I get it printed for 50 cents at a local copy shop. I print it on a glossy type of paper. It is totally worth the 50 cents, and I don’t waste my ink on my printer. I’m not sure of what the paper is called, but if you go to any print shop and just ask for a glossy paper, I’m sure they’ll have it for you. (And give you the proper name.)

Now that you know how to make these, go and make one, they’re SUPER cute and as I said before they get easier the more you do, good luck and ask me if you have any questions, I’d love to HELP!
 Related: If you found my tutorial useful, you may also like
How to make a Chalkboard from Dollar Store Platters with Homemade Chalkboard Paint-cheap, easy, and fun!
Or keyword my name Mackenzie to find other DIY crafts I recently posted

- 5-Winter Themed Bone Chilling Survival Movies on Netflix - 12/29/2017
- 7 Best Scary Movies for Kids that are Streaming on NETFLIX - 10/13/2017
- Watch P. King Duckling on Disney Junior + Giveaway - 06/26/2017

Hi!
I love this….I tried to follow your instructions and it was just too hard for me! It wasn’t coming out right!
Have you thought about making these for other people? I would pay!
Let me know 🙂
Please email me,
Ashley
Hello Ashley!
I am so sorry I just read your comment. I have actually opened up an Etsy shop where I sell these. Check it out here, and if you are interested, please email me at [email protected]
http://www.etsy.com/shop/KenziesPrints?ref=search_shop_redirect Here is the link to my Etsy shop!
This may sound dumb… but literally when I click the ‘A,’ nothing happens… depending on the letter I hit on my keyboard, it recognizes it as a keystroke I’m assuming, and then the other tools are highlighted (like the lasso, or pencil, etc.)… please advise. Thanks!
Once you click the A a small box should appear. you may want to try and click the picture window down for a time, then see if it pops up. I just made an Etsy shop. I sell a digital download of this style for $3. If you are interested you can check it out here! https://www.etsy.com/your/listings?ref=si_your_shop
Oops! This link might work better:
http://www.etsy.com/shop/KenziesPrints?ref=search_shop_redirect
How creative.
Too Cute!!
I used this to make one yesterday for my son’s first birthday and it turned out GREAT!!!
Thanks for the instructions 🙂
Thank you so much for sharing this I REALLY want to make one for my Daughters first Birthday I noticed them on a website that I could buy one from but I would rather make it myself first time mom. I just think it would be neat if I could do this for my daughter. So I just wanted to say A BIG THANKS FOR SHARING. Know lets just hope I can do it
Hi there
I am so excited to do this but its starting to drive me nuts.
i dont know how to find the stamps and signs. how do i insert them?
thank you
You ROCK! Thank you so much for posting this. I love that you did this with free programs and fonts! Thank you so much!
Good Morning,
Are the dots and lines dingbats? If so, which ones did you use?
Thanks!
What size did you have it printed?
I Love this idea!!!!
This is a great idea and I love how you’ve explained it based on using GIMP! 😉 I plan on printing these up for use during newborn and birthday photo shoots and I’ll send them home as extra gifts when the shoot is done. A great idea! I’ve also put up a blog post on my page at http://www.shootforwind.com linking back to here in the hope that more people see your great tips!
Do you have a template for this I can use?
I have a MAC but your downloads are for Windows based operating systems only.. HELP! 🙂 Thanks!
I have a Mac, too. I was able to download it here: http://www.downloadfast.co/download/gimp/mac/free-download/?lp=adwords&tg=us&kw=Gimp+for+mac&mt=e&ad=49574931403&pl=&ds=s&gclid=CjwKEAiAhIejBRCKm_fTxIWyyXcSJABXY0XYGPp3qTG3p65VWUNPV2qrZ0wRMJGm0RWhncdqdMF1jxoCGa3w_wcB
i downloaded the fonts and installed them, as well as some of the dingbats. how do you use the dingbats in gimp? 🙂 i can’t seem to figure that part out!
Thank you so much for posting this! It was so helpful and exactly what I had been searching for to do this project myself.
I’m so glad it was helpful
Awesome tip! I followed the instructions and accomplished a great work. Thanks xoxoxo
You’re welcome! So glad it was helpful. We would love to see your creation. Please post it to our FB page
Thank you so much for posting this tutorial for everyone to use. It was so helpful for you to share the links for everything you used, and I’m really thankful that I now have a cute chalkboard for my son’s 1st birthday…and it was free! THANKS!! 🙂
You’re welcome Lindsay! So glad it was helpful. We would love to see your creation. Please post it to our FB page
not a spam user
This is really frustrating and extremely time consuming. Its really hard to find the specific fonts. i gave up after 30 minutes. there is no center correction. its nice for someone who has alot of time but geeze!
Trying to view this but this comment box is in the way.
Hi, thank you so much for this wonderful tutorial. I followed your step and it’s coming out great, I think! My next step is to add some clip art because my baby’s first birthday theme will be in sweet safari so I want to add some clip art of animals. Can you tell me if there’s any special techinques? And how do I crop the size of the clip art? I’d really appreicate it if you can take some time to answer my questions! Thanks!!!
Hi Grace! To add clipart you can go to file – open as layers – click the picture you want from your computer and it should appear. You can move it with the move tool to place it where you like.
If the clipart image is too big then simply click on the image on your layers bar. Then select the scale image button (it looks like a square and then another square.)
I hope this helps you!
If the clip art is
Hi Mackenzie,
It did work! Thank you so much! I already have the poster printed and it looks great! I can’t wait to show it off at my daughter’s party in 2 weeks! I wish I can post a picutre to share with you but don’t think this blog allows me to upload a picture. Thank you so much again! You helped make the party even more special!
Grace
Hi Mackenzie,
Its very beautiful , the chalkboard poster. I would love to do one for my son’s first bday. But i have lots of doubts. First of all, do you use a software or tool or do it just in paint. I am not sure where to import the fonts and dingbats to. Can you please help me..
Thanks,
Chinnu
Oh, i just read it again and found about gimp, but couldnt go to that link. Can you tell me the best link to download it from as it says lot of them are not safe.
Hmmm, I’m not to sure as to what to do. I would just look around online. I’m so very sorry I can’t be more helpful. Maybe try checking on the officia Gimpl site
Question how did you use the dingbats, and other stuff you decorated with? How do I add them? Where will they be located on my computer?
Sadly, every computeris different. Usually the songs are in your download folder. Then you have to extract the file, then click download. If G IMP is open when you download the fonts, the new fonts will not show up until you exit out of GIMP and reopen it. I wish I could help you more.
I figured it out thank… I have another question how do I place the dingbats & other decorative stuff throughout the board?
You need to use the move tool it looks like a small cross kind of. 🙂
Hi
Do you insert the dingbats using the text box? And how do you put vertical lines???
Thanks
Love!!! Just wondering what size you had printed?
Thanks for sharing!!
Thank you for all of your helpful tips and links. This is gorgeous and I’ve been formatting all morning!
You’re very welcome! Glad it was helpful (Irina on behalf of Kenzie)
Hi Momma!
Thanks for sharing (I know you’ve read that a million times, but every momma needs as much appreciation as she can get!). I am trying to download gimp and it keeps taking me to a random page called SourceForge. Is that what it’s supposed to do?
Nevermind! I realized I was attempting to download from your link and it was outdated!
Hi Sidney, I have checked the link and it is correct. It should take you to the page to download Gimp (getgimp.com)
Did you get it to work?
i hope that i do not get a virus i downloaded from source forge 🙁 i didnt realize it was outdated.
I have downloaded the program to my Mac and downloaded the fonts and dingbats but I can’t figure out how to use the dingbats – Help ;o(
I am not sure what you are asking. Can you expand more on your question? Thanks!
What font did you use for Annie’s name?
I used the font Chalk hand lettering.
how do I get the designs ans stuff on gimp? I downloaded them but idk how to put them on a picture
Hi to get pictures that you have downloaded online, you will need to go to the top menu and then do file >> open as layers. Hope this helps!
Ok I’ve downloaded Gimp along with the fonts and dingbats. When I pull up gimp amd add a layer to add text….. it doesn’t give me any option to add text. What am I doing wrong????
Try clicking the “A” button. That is the font text button. It will then allow you to draw a text box.
How did you get the lines and dots?
I got the lines and dots from the font, Bergamot. You can also use periods continuously for dots, and dashes or underscores for lines.
I just have to say, THANK YOU for posting this. I just used your tips for the first time and it worked like a charm!
This might be a silly question but did you print it on black paper or was it normal white printing paper id have to print it at home as i am from Ireland and we done actually have a copy shop 🙂 Thanks
I used white paper because that will show the chalkboard effect. If you print on black paper, you won’t notice it’s on a chalkboard background and it will waste all that ink.
Hi Mackenzie,
thank you so much for the above article. Very helpful!
I have a question with respect to the ‘FREE chalk board background’ that you have above. Is this also free for commercial use, for instance on a website? Can you say where you got it?
Thanks very much in advance for your reply. 🙂
I got the lines and dots from the font, Bergamot. You can also use periods continuously for dots, and dashes or underscores for lines.
I replied to the wrong one. My mistake. I got the chalkboard from a website. It’s been so long, I can’t even remember from who. I would say that this is not for commercial use because this isn’t my work. Thanks.
hi ,
i love these trying to make one for my son , have dowloaded some fonts on the font link you said but i cannot get them up on word for some strange reason.
HELP PLEASE !
I am not quite sure what to do for that. I don’t have Windows, so I can’t tell you how to download and unzip a font file. My best advice is to look up a tutorial how to unzip a font file on Windows.
Hi, I was curious if you want it on a poster board bigger than 8×10 say like 24×36 or something like that, what do you do? Can you just take it to Kinko’s and have them printed it on a size that big or will it be pixelated?
I think this chalkboard should come out not pixelated. But if you want to be sure, you can google search- free high resolution chalkboard download. Then you’ll for sure have the right size chalkboard.
Do you know how we could go about this if we wanted bigger than 8×10?
Thank you so much for posting this out. It turned out to be great for me to announce the pregnancy of our twins! God bless you
how did you do it
i cant do it they way you say
Hi, how do we get the flavour and frames into gimp??
When I go to dafont to download the fonts, they are downloaded as jpegs not ttf or otf or fon as the site says it should. What is happening here? What am I doing wrong?
Hi i am trying to make a chalkboard with gimp. But I never Is er gimp before. I wanted to draw door liars to devide like your example but i only het thik lines and i want a thin line can you help?
Your writing has a softness to it that invites reflection, offering space for deeper thought.
The words feel cultivated, like a garden tended with care. Each phrase blossoms with intention, yet the whole remains natural and organic, reminding the reader that beauty lies in both detail and unity.
1
1
Our AI-optimized service sends high-intent, keyword-targeted visitors to your site, saving you money compared to paid ad campaigns. Ready to get started?
marketingager.com
Doceniam to co robisz i to co piszesz. dziękuję Ci za zaangażowanie i wkład w społeczność blogową. Trzymaj tak dalej sukces jest na wyciągniecie ręki 🙂